|
|
추천수: 1
|
|||||||||||
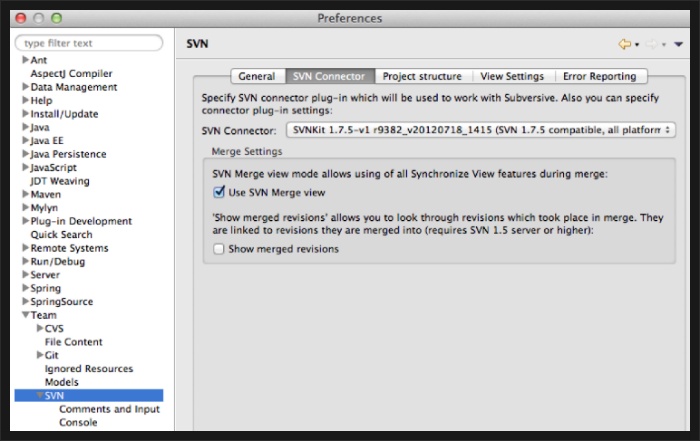
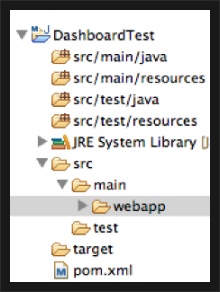
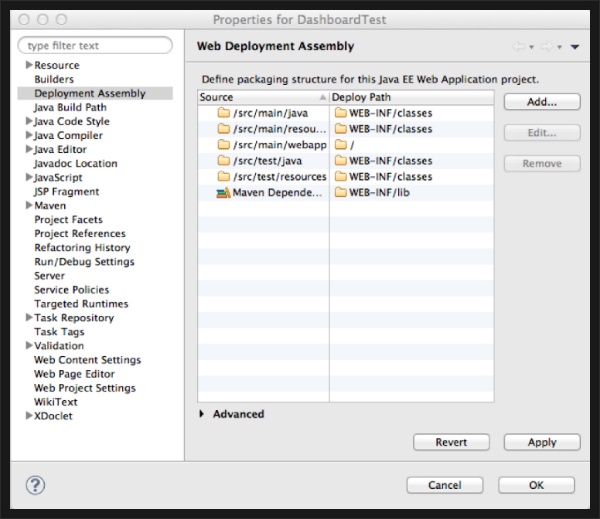
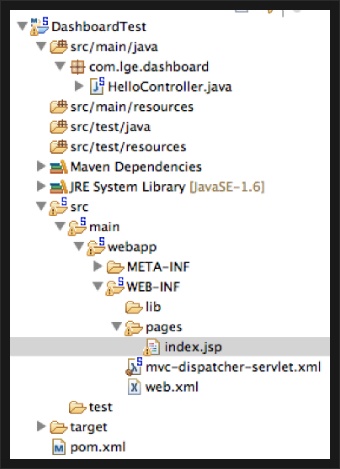
[BI Dashboard] Eclipse Juno에 Spring + Maven 환경설정 및 테스트자바기반 서버 환경 구축을 위한 기반 기술 설정에 대하여 알아보자. 우선 빌드환경인 Maven과 Spring Framework을 설치하고 간단히 RESTful 호출 테스트를 해보자 1. Eclipse 플러그인 설치 - Eclipse Juno를 다운로드하여 설치 및 JDK1.6 사용 - Sublime text 사용에 익숙하다면 http://eclipsecolorthemes.org/ 플러그인을 설치후 에서 Sublime Theme으로 바꾸어 사용한다 - Eclipse Marketplace에서 + STS (Spring Tool Suite - juno 4.2)를 설치 + Maven (Maven Integration for Eclipse - juno and newer)를 설치 + Git 사용한다면 EGit - Git Team Provider를 설치 + SVN 사용한다면 Subversive - SVN Team Provider 설치 (참조1, 참조2) > "Help/Install New Software..."에서 > SVN Connector - http://community.polarion.com/projects/subversive/download/eclipse/3.0/juno-site/ 통해 설치 Mac의 HL 부분은 unselect > SVN Kit 1.7.8 선택한다. 2. Spring MVC 프로젝트 구성 - Maven으로 Simple project를 만든다. jar 배포 프로젝트로 만듦 - 프로퍼티에서 Project facets에서 "Dynamics Web Module"를 선택하고 "Further configuration available..."에서 webapp 설정 - webapp를 설정하였으면 src/main 밑으로 강제 이동시킴 - 프로퍼티에서 Deployment Assembly에서 add... 하여 Maven Denpendencies... 라이브러리가 WEB-INF/lib에 포함되도록 설정 (참조) - pom.xml 에서 <packaging>jar</packaging>에서 <packaging>war</packaging>로 바꾼다 - 하기 의존성 라이브러리를 추가한다 + Spring Framework : v3.2.0 + JDK : v1.6 + JUnit : v4.11 <project xmlns="http://maven.apache.org/POM/4.0.0" xmlns:xsi="http://www.w3.org/2001/XMLSchema-instance" xsi:schemaLocation="http://maven.apache.org/POM/4.0.0 http://maven.apache.org/xsd/maven-4.0.0.xsd"> <modelVersion>4.0.0</modelVersion> <groupId>com.ysyun</groupId> <artifactId>DashboardTest</artifactId> <version>0.0.1-SNAPSHOT</version> <packaging>war</packaging> <properties> <spring.version>3.2.0.RELEASE</spring.version> <junit.version>4.11</junit.version> <jdk.version>1.6</jdk.version> </properties> <dependencies> <!-- Spring 3 dependencies --> <dependency> <groupId>org.springframework</groupId> <artifactId>spring-core</artifactId> <version>${spring.version}</version> </dependency> <dependency> <groupId>org.springframework</groupId> <artifactId>spring-web</artifactId> <version>${spring.version}</version> </dependency> <dependency> <groupId>org.springframework</groupId> <artifactId>spring-webmvc</artifactId> <version>${spring.version}</version> </dependency> <dependency> <groupId>junit</groupId> <artifactId>junit</artifactId> <version>${junit.version}</version> <scope>test</scope> </dependency> </dependencies> <build> <finalName>DashboardTest</finalName> <plugins> <plugin> <groupId>org.apache.maven.plugins</groupId> <artifactId>maven-compiler-plugin</artifactId> <version>3.0</version> <configuration> <source>${jdk.version}</source> <target>${jdk.version}</target> </configuration> </plugin> </plugins> </build> </project> 3. RESTful 테스트 하기 - Controller 추가하기 : RESTful uri 설정 package com.lge.dashboard; import org.springframework.stereotype.Controller; import org.springframework.ui.ModelMap; import org.springframework.web.bind.annotation.PathVariable; import org.springframework.web.bind.annotation.RequestMapping; import org.springframework.web.bind.annotation.RequestMethod; @Controller @RequestMapping("/") public class HelloController { @RequestMapping(value="/welcome", method = RequestMethod.GET) public String welcome(ModelMap model) { model.addAttribute("message", "Maven Web Project + Spring 3 MVC - welcome()"); //Spring uses InternalResourceViewResolver and return back index.jsp return "index";
} @RequestMapping(value="/welcome/{name}", method = RequestMethod.GET) public String welcomeName(@PathVariable String name, ModelMap model) { model.addAttribute("message", "Maven Web Project + Spring 3 MVC - " + name); return "index"; } } - web.xml 설정 : spring dispatcher를 설정한다 <?xml version="1.0" encoding="UTF-8"?> <web-app xmlns:xsi="http://www.w3.org/2001/XMLSchema-instance" xmlns="http://java.sun.com/xml/ns/javaee" xmlns:web="http://java.sun.com/xml/ns/javaee/web-app_2_5.xsd" xsi:schemaLocation="http://java.sun.com/xml/ns/javaee http://java.sun.com/xml/ns/javaee/web-app_3_0.xsd" id="WebApp_ID" version="3.0">
<display-name>Counter Web Application</display-name> <servlet> <servlet-name>mvc-dispatcher</servlet-name> <servlet-class>org.springframework.web.servlet.DispatcherServlet</servlet-class> <load-on-startup>1</load-on-startup> </servlet> <servlet-mapping> <servlet-name>mvc-dispatcher</servlet-name> <url-pattern>/</url-pattern> </servlet-mapping> <context-param> <param-name>contextConfigLocation</param-name> <param-value>/WEB-INF/mvc-dispatcher-servlet.xml</param-value> </context-param> <listener> <listener-class>org.springframework.web.context.ContextLoaderListener</listener-class> </listener> </web-app> - mvc-dispathcer-servlet.xml 스프링 환경설정 <beans xmlns="http://www.springframework.org/schema/beans" xmlns:context="http://www.springframework.org/schema/context" xmlns:xsi="http://www.w3.org/2001/XMLSchema-instance" xsi:schemaLocation=" http://www.springframework.org/schema/beans http://www.springframework.org/schema/beans/spring-beans-3.0.xsd http://www.springframework.org/schema/context http://www.springframework.org/schema/context/spring-context-3.0.xsd"> <context:component-scan base-package="com.lge.*" />
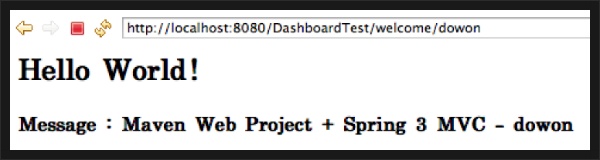
<bean class="org.springframework.web.servlet.view.InternalResourceViewResolver"> <property name="prefix"> <value>/WEB-INF/pages/</value> </property> <property name="suffix"> <value>.jsp</value> </property> </bean> </beans> - WEB-INF/pages폴더를 만들고 index.jsp 파일 생성 <html> <body> <h2>Hello World!</h2> <h4>Message : ${message}</h1> </body> </html> - 전체 설정 정보 - Tomcat v7.0 설정이 되었다면 Run As 에서 "Run on Server"로 DashboardTest 컨텍스트 추가하여 Tomcat 기동 /<contextName>/welcome/<value> 넣어서 호출하면 하기와 같이 나온다 - maven Goal에 대한 명령을 수행할 경우 Goal은 ant의 target과 같은 개념으로, mvn의 경우 pre-defined goal을 가지고 있다. mvn compile : 컴파일 수행 mvn package : jar 파일로 패키징 mvn test : JUnit 테스트 수행 mvn install : local repository (PC내의 디렉토리)에 해당 jar 파일을 저장 mvn deploy : remote repository (Nexus)에 jar 파일 저장 mvn clean : 컴파일 내용 모두 삭제 mvn build : 위의 예제는 일반적은 spring-java 코드로 build goal을 제공하지 않는다. (Eclipse에서 run as하면 나와서 헷갈리게 만드는데) build goal을 지원하는 프로젝트를 만들거나 또는 pom.xml안에 인위적으로 build goal을 지정해줘야 한다. 보통 clean install 등 여러 명령을 스페이스로 구분하여 파라미터를 줄 수 있다 - 만들어진 pom.xml 파일 <project xmlns="http://maven.apache.org/POM/4.0.0" xmlns:xsi="http://www.w3.org/2001/XMLSchema-instance" xsi:schemaLocation="http://maven.apache.org/POM/4.0.0 http://maven.apache.org/xsd/maven-4.0.0.xsd"> <modelVersion>4.0.0</modelVersion> <groupId>com.ysyun</groupId> <artifactId>DashboardTest</artifactId> <version>0.0.1-SNAPSHOT</version> <packaging>war</packaging> <url>http://maven.apache.org</url> <properties> <project.build.sourceEncoding>UTF-8</project.build.sourceEncoding> <spring.version>3.2.0.RELEASE</spring.version> <junit.version>4.11</junit.version> <jdk.version>1.6</jdk.version> </properties> <dependencies> <dependency> <groupId>org.springframework</groupId> <artifactId>spring-core</artifactId> <version>${spring.version}</version> </dependency> <dependency> <groupId>org.springframework</groupId> <artifactId>spring-web</artifactId> <version>${spring.version}</version> </dependency> <dependency> <groupId>org.springframework</groupId> <artifactId>spring-webmvc</artifactId> <version>${spring.version}</version> </dependency> <dependency> <groupId>junit</groupId> <artifactId>junit</artifactId> <version>${junit.version}</version> <scope>test</scope> </dependency> </dependencies>
<build> <finalName>DashboardTest</finalName> <plugins> <plugin> <groupId>org.apache.maven.plugins</groupId> <artifactId>maven-compiler-plugin</artifactId> <version>3.0</version> <configuration> <source>${jdk.version}</source> <target>${jdk.version}</target> </configuration> </plugin> </plugins> </build> </project> 4. Spring 에 대한 Enterprise 환경 설정 원칙 - Enterprise Spring Best Practices - Bean Post Processors를 등록하는 어노테이션 RequiredAnnotationBeanPostProcessor – (@Required) CommonAnnotationBeanPostProcessor – (@PostConstruct, @PreDestroy, @Resource, etc.) AutowiredAnnotationBeanPostProcessor – (@Autowired, @Value, @Inject, etc.) PersistenceAnnotationBeanPostProcessor – (@PersistenceUnit, @PersistenceContext, etc.) - annotation-config 지시자 설정 <context:annotation-config/> - 애플리케이션 컴포넌트 scanning 지시자 설정 <context:component-scan base-package="com.gordondickens.enterprisespring" use-default-filters="false"> <context:exclude-filter expression="org.springframework.stereotype.Controller" type="annotation"/> </context:component-scan> - 스캐닝 원칙 + Component scanning should ONLY be configured in the bootstrap config file, not in every XML config file + Do NOT also include the <context:annotation-config/> directive, it is automatically included by component scan + Do NOT start scanning from “com” and/or “org”, as this will scan ALL sub packages in all of the project and jars for candidates! + Be as specific as possible with the packages + Do NOT cross application boundaries with component-scan + Create an applicationContext-services.xml for scanning services + Create an applicationContext-persistence.xml for persistence and entity beans + Create an applicationContext-webmvc.xml for persistence and entity beans + Create an applicationContext-webservice.xml for web service beans + Import these references into the applicationContext-bootstrap.xml to these elements Why separate the discovery files into layer specific configuration? + Unit testing is easier as discovery of beans is more specific + Allows the project to be separated into multiple Jar/Wars + Lowers risk of widely scoped discovery issues, overscanning and beans being replaced by multiple scanners <참조> - STS + myBatis + RESTful 설정 및 테스트 - Eclipse Juno기반 Spring MVC with maven으로 만드는 과정 - Maven Console 기반 webapp RESTful 서비스 만드는 과정 - AngularJS + SpringMVC 샘플 프로젝트 - Spring에서 Enterprise 환경 설정 원칙 |
|||||||||||
| [Eclipse, Maven, Tomcat] Maven으로 구성한 웹 프로젝트가 Eclipse에서 실행되지 않는 문제 | ||
| [maven] Spring+Maven 원격 Tomcat 서버에 배포하기 | ||
|
|